concrete
Concrete Services

The Importance of Proper Concrete Installation

Concrete is one of the strongest building materials available, but it must be poured correctly to avoid problems. The process is labor-intensive and requires specialized tools. It is often best to hire Concrete Contractors Colorado Springs for concrete installation.

After the bull float smooths the concrete, use a magnesium hand float to create a smooth finish. Work the surface until it is smooth and free of drag marks.

concrete

Concrete is a strong and durable material used to construct foundations, patios, sidewalks, driveways, walls, and other structures. Proper concrete installation and preparation procedures are crucial to the longevity of your project. This includes excavating the space to the correct depth, laying a subbase and damp-proof membrane as needed, and ensuring the surface is level and obstructed. If these steps are not taken, your concrete could crack or crumble in the future.

To begin the process of preparing for a concrete pour, mark out the area to be poured with stakes and string. This helps ensure that the concrete is poured exactly where it needs to be and stays contained while it sets. It is also good to note any pipes, wires, or other obstacles near your concrete, as they must be avoided during construction.

Once the form boards are in place, treating them with light-bodied petroleum oil or shellac (if using wooden forms) is a good idea to prevent the concrete from sticking to the forms once it hardens. This will also allow the forms to be removed easily once the concrete has been set.

Depending on your project, you may need to excavate the area, compact the soil, and add a layer of gravel for drainage. If you are working with clay or loamy soil, this is especially important, as these types of soil tend to move and settle, which can cause concrete slabs to crack, even when reinforced with steel and microfibers.

Once the base is in place, it is a good idea to use a plate compactor to compress each subbase layer. It is also a good idea to use a long-handled groover to cut control joints into your concrete once it has cured, as this will help to prevent cracking and settlement in the future.

Now that the concrete has been poured, it is a good idea to smooth it with a large floating device known as a bull float and then with a magnesium hand float for a more professional finish. Once the concrete dries, it is possible to add texture for traction with a concrete broom, and decorative stamping can also be done at this point.

The type of mix you use for your concrete is a huge factor in the quality of the finished product. Many different concrete mixes are available, each with its particular properties and strengths. Concrete is a composite material that requires careful mixing to achieve the desired results. Whether mixing your concrete or purchasing pre-mixed bags from your local hardware store, it is important to follow the instructions on the packaging. Using the proper water-to-concrete ratio and following safety precautions are crucial for success.

There are several ways to mix concrete, from a mixer with a bucket to a wheelbarrow and even by hand. The method you choose depends on the size of your project and what tools or equipment you have on hand. If you are working with a larger job like a concrete countertop, renting or buying a cement mixer is best. If you are working on a smaller project, you can mix the concrete by hand in a large bucket, washtub, plastic sheet, or tarp. When mixing concrete by hand, wearing thick gloves that will not rip is important. Concrete is caustic, so you want to protect your hands as much as possible.

If you are using a mixer, add the dry concrete mix and create a small divot in the center. Pour in about 3/4 of the water and mix thoroughly. Remember that the amount of water needed varies by mix, so check the instructions on the package for exact measurements.

Once the concrete has been mixed, it is important to let it rest for about one minute. This gives the concrete time to hydrate and improves its strength. After letting it rest, it is important to test the consistency. If the concrete is too wet, it will pack into a ball and crumble when touched. It will be stiff and difficult to work with if it is too dry.

If you are still deciding what type of concrete to purchase, the staff at your local hardware store should be able to help. They can advise you which mix will be best for your project and provide guidance on properly using the equipment for mixing. They can also assist you with performing a slump test to determine the consistency of your concrete.

Pouring a solid concrete slab is essential in nearly all construction projects. It’s used to provide support for a wide variety of structures, including floors, driveways, and foundations. While most people think pouring concrete is a very hard and laborious task, it is fairly straightforward if the proper steps are taken.

First, prepare the area where the concrete will be poured by digging a hole that’s the exact size and shape of the future slab. Next, remove any grass, rocks, dirt, or other debris until the raw earth is exposed. Once the area has been cleared, it’s time to start building the form. Use standard lumber like 2×12 boards to create a rectangular or square shape that will be the concrete form. Nail the form boards to stakes driven into the ground, and level the site as necessary using a builder’s level.

To avoid mistakes that could compromise the quality of the concrete, you’ll want to carefully plan out your project before beginning the actual concrete pour. For example, you’ll want to ensure the weather suits a concrete pour. If rain is in the forecast, it may ruin the appearance of the finished product and increase the risk of cracking and scaling. A moderately warm, dry day is ideal for pouring concrete.

One of the most common mistakes that DIYers make is adding too much water to their concrete mix. This can make the concrete easier to work with and pour but also reduce its strength. Using the right water-cement ratio and mixing is important for achieving high-quality concrete.

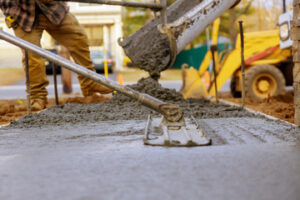
After pouring the concrete, you’ll need to level and smooth it. A wood or bull float can create a smooth surface, but you must move slowly and apply gentle pressure. To achieve a professional finish, follow up with a magnesium “mag” float to polish the concrete to a high shine.

For safety reasons, professionals and DIYers should wear the appropriate protective gear when working with concrete. This includes long pants and sleeves, protective eyewear, and alkali-resistant gloves. Wearing a disposable dust mask is also a good idea, as wet concrete can irritate the throat and respiratory tract.

Concrete can be finished in several ways to make it more attractive and easier to maintain. These finishes range from smooth to rugged and can be done in various colors. The key to a good finish is timing. The finishing process should begin almost immediately after the concrete is poured and the bleed water has disappeared. The concrete finisher should know exactly when to use each tool in the finishing process. This is an art learned through years of experience and can be the difference between a poor-quality slab of concrete and one that lasts a lifetime.

The concrete is troweled by hand or with power floats during the finishing stage to create a smooth surface. It is also screeded or leveled at this point. This step is important to ensure that the concrete will be of uniform height. The concrete can be used for light foot traffic 3 to 4 days after placement and can be driven 5 to 7 days after that, but the curing process isn’t complete until 28 days have passed.

The final steps in the concrete installation process are finishing and curing. The concrete is brushed to remove any hydration water, and a sealer is applied to prevent stains and protect the concrete. The concrete is then allowed to cure. During this time, the concrete will strengthen, which can take up to a month. The concrete can be used after curing for pedestrian and vehicular traffic.

Although DIYers can pour and finish their concrete, it is recommended that a professional crew be hired to do the job. Concrete is heavy and requires special equipment to handle it properly. A concrete contractor is trained to work safely and has the proper tools to do the job. An experienced concrete finisher can also read the concrete and know when to tamp or smooth it. This can save time and money by working the concrete effectively. Concrete finishers can also add a decorative touch to the concrete by stamping and staining it before finishing.


Plumber
Plumbing

How to Become a Plumber

Plumbers Spring TX install and repair systems that transport water, gas, and waste. They also collaborate with other professionals, such as architects and construction teams, to ensure that plumbing systems are integrated seamlessly into building projects.Plumber

If you are interested in becoming a plumber, consider starting out with a vocational school program or an apprenticeship. This will allow you to earn money while you learn the trade.

Plumbers are responsible for the installation, maintenance, and repair of plumbing systems. They work with water and gas pipes to ensure that water is available and that waste is removed efficiently. They also install and repair fixtures such as bathtubs, toilets, sinks, and water heaters. They also maintain septic systems and drain lines. Many cities require that plumbers have a license to work in the field. In addition, some plumbers specialize in specific types of plumbing systems. For example, master plumbers often work with complex piping systems in high-rise buildings. These professionals must be able to discreetly run pipework through multi-story structures while meeting local plumbing codes.

In addition to these physical demands, plumbers must have good interpersonal skills. They must be able to listen to customers’ complaints and figure out how to resolve them. They must also be able to read and interpret blueprints. A good plumber is also a critical thinker and must be able to weigh different solutions. In some cases, they may need to collaborate with other professionals, such as electricians and construction teams.

Most plumbers have full-time jobs and are on call during the evenings and weekends. They may also need to work on holidays. Some plumbers work for large companies and have set schedules, while others are self-employed. In both cases, these workers must be able to work in tight spaces and travel between jobs.

Plumbers work primarily in residential homes and commercial buildings. They may also work in factories or power plants. Some plumbers specialize in service and repair work, while others focus on new construction or large-scale projects. Some are certified to work on gas and water heating systems.

Plumbers typically start their careers by earning an apprenticeship with a union or non-union training program. The program includes on-the-job training, technical instruction, and exams. After completing an apprenticeship, plumbers can apply to take the Interprovincial Exam and become certified journeypeople. Some plumbers choose to pursue other certifications to demonstrate their competence to employers and clients. Certifications such as National Inspection Testing and Certification and the International Association of Plumbing and Mechanical Officials are not required but can increase a plumber’s marketability.

Education and training requirements

In order to become a plumber, you will need to have certain qualifications. These include a high school diploma or GED certificate and an apprenticeship or training program that will teach you the skills of the trade. In addition, most states require that you obtain a license. There are many different ways to get the training you need, such as through a formal apprenticeship, a vocational school, or an online program. Many colleges offer courses that can help you become a plumber. For example, the SUNY college system offers several Associate of Applied Science degrees related to plumbing.

The first step is to get your high school diploma or GED certificate. This is important because it will give you a foundation for the math and science you need to succeed in the field. It is also necessary for the next step, which is to enroll in a vocational school that offers a program in plumbing. You will want to choose a program that will be both practical and comprehensive, with hands-on labs and classroom instruction. Ideally, you should choose a program that will prepare you to pass the state certification exam.

Most plumbers receive their education through a formal apprenticeship program, which typically lasts five years. This includes both classroom instruction and paid on-the-job training. These programs are sponsored by unions and employers and can be found in most states. In New York, there are many apprenticeship opportunities through local United Association unions. The apprenticeship program will teach you the basics of plumbing, including safety, drafting, and blueprint reading, as well as the intricacies of local codes and regulations.

In addition to education and training, it is essential for a plumber to have good communication skills. This is because the plumbing industry can be stressful, and it is important to communicate with customers in a friendly and professional manner. It is also helpful to be able to listen to customer complaints and determine the cause of the problem. Other soft skills that are needed for this job include manual dexterity, coordination, and analytical thinking.

Work environment

The work environment for a plumber varies depending on the type of plumbing project they’re working on. Typically, plumbers work on pipes that transport water and waste in homes and commercial buildings. They also install and repair plumbing fixtures, such as toilets, sinks, showers, and baths. They may also install appliances that have water line connections, such as washing machines and fridges.

Plumbers must be able to work in tight spaces and on complicated plumbing projects for long periods of time. They also need to be able to handle heavy tools and large amounts of material. Many plumbers have to be on call for emergency services, so they must be able to handle unexpected work requests.

Typical workplaces for plumbers include residential and commercial buildings, industrial sites, and construction sites. In residential settings, plumbers often work directly in people’s homes and apartments. They may also work in confined spaces, such as crawl spaces or basements. They interact with clients frequently and may need to explain technical information about their plumbing system. Plumbers often have to follow specific safety guidelines when working in these environments.

Plumbers who specialize in green or sustainable plumbing practices work in a different kind of environment. They often collaborate with other professionals, such as electricians, to ensure their systems work well together and meet all relevant standards and codes. In addition, they might need to educate their clients about how to use environmentally friendly fixtures and appliances.

Many plumbers work independently or for smaller companies that specialize in a certain area of plumbing. Others work for large companies that offer a variety of plumbing services. They must be able to work in multiple locations and shifts, and they may need to travel between jobs.

Plumbers who are self-employed or who own their own business have more control over their schedule and can choose the hours they want to work. They usually need to be on call at night or on weekends to respond to emergencies. They must also be able to complete their work quickly and efficiently. Plumbers also need to be able to communicate clearly with their customers and other workers.

Salary

Plumbers are skilled construction workers who install, maintain, and repair pipes that supply water or other liquids and gases to homes, businesses, and industry. They also identify and repair plumbing problems, such as leaks or clogged drains. They are typically trained at a vocational school or through an apprenticeship, and many work for unions.

The average salary for a plumber varies by location, experience, and employer. Some states offer higher wages than others, but it’s important to consider the cost of living when choosing a location. In addition to salaries, plumbers often earn tips and bonuses. These bonuses can add up quickly and significantly to a plumber’s overall income.

Most plumbers work in residential settings, but some also work for commercial and industrial clients. These jobs require more specialized skills and may involve working in cramped spaces. In addition, plumbers must know local city codes to ensure that their work complies with inspection requirements. Some plumbers are self-employed, while others work for larger companies that employ them as journeymen or apprentices.

A successful plumber is a patient individual with a practical mind and manual dexterity. He or she must be able to troubleshoot and solve problems quickly. Plumbers are also required to have stamina as they perform physically demanding labor and may need to crawl in tight spaces or attics. They also interact with customers on a daily basis and must be friendly and courteous.

Entry-level plumbers generally earn between $33,500 and $113,500 per year, depending on their state, education, skills, and employer. Some plumbers also receive overtime and other benefits.

A plumber’s job is crucial to our daily lives, and without plumbers, we would be unable to have clean water or drainage systems. These professionals are in high demand, and the salaries they earn reflect that fact. The good news is that they can make a decent living while enjoying flexible hours and a great career path. Many plumbers also join a union, which can improve their career prospects even more. Some of these unions even have scholarships available for students who want to enter the plumbing field.

Deck
Deck

How to Build a Deck

Decks Charleston SC are flat surface that supports weight, are usually built outdoors and are connected to a building. The word deck derives from the deck of a ship. There are various different types of decks, and the word itself is a generalization of the term. There are many different things to consider before building a deck, including the design of the deck and how to properly install the decking.Deck

Composite materials have emerged in the last decade as a popular choice for decking. These decking materials offer a variety of advantages, including durability, aesthetic appeal, and cost savings. They are easy to care for and require little maintenance. They are also extremely stain resistant and will not warp, split, or splinter.

Pressure-treated lumber is an inexpensive choice that is incredibly durable and rot-resistant. It is widely available in the states and is ideal for decks that are in direct contact with the ground. Because of its chemical treatment, pressure-treated lumber won’t swell, split, wrap, or mold. However, it will need to be treated with lumber preservative annually to maintain its strength and beauty. It is also the least expensive option, and its strength makes it the perfect choice for do-it-yourselfers. In addition, pressure-treated lumber is easy to cut and fasten with nails.

Tropical hardwoods are another choice for decking. They are dense, rich-grained, and naturally resistant to insects. They are also highly durable and are typically secured with hidden fasteners. This option is suited for homes in tropical climates. However, it is expensive outside of those regions. In these regions, the cost of redwood is much higher.

The best decking materials depend on your budget and lifestyle. Pressure-treated wood, for example, is inexpensive and requires very little maintenance. However, you’ll need to regularly stain or seal the deck to protect it from the elements. Cedar and redwood are naturally superior to pressure-treated wood and can resist rot and insects. However, you’ll have to apply a protective finish every three to four years if you want to maintain the color and finish of the deck.

Proper spacing between deck planks is an important part of a successful deck installation. One-quarter-inch increments can make a significant difference, particularly at the ends of the deck. Ideally, the decking should extend an inch beyond the fascia. Use a circular saw with a blade that is set one-quarter-inch below the decking. Pull the blade backward until the blade comes to a stop before pushing the saw into the wood.

Exotic wood is more difficult to drill and cut than softwood. Use a saw blade with a thin kerf. Use a sharp bit to bore a hole approximately the size of the fastener head, plus one-fourth-inch. If you use a wood plug, a hole 1/4-inch deep will work fine.

The design should allow for adequate cross ventilation under the deck to avoid moisture build-up and warping. Ideally, the deck should be designed to allow at least 18 inches of open space beneath the decking joists and sides. The decking should have a slight overhang from the fascia and rim joists.

The installation process is easier with the use of a deck bracket. Deck brackets are available in galvanized steel and stainless steel and can be used for 2x and 5/4 decking. The deck brackets attach to the decking with screws that are inserted from below. If you choose this method, remember that it will take more time and expense.

Regular deck maintenance is important to protect the appearance and longevity of your deck. You need to inspect the surface regularly for signs of rot and cracks. If you spot small patches, you should get professional help right away. Cracked or rotten wood can be dangerous. You should also keep an eye on nearby trees and bushes to prevent the wood from discoloring.

Mould can make your decking slick, especially in damp conditions. To prevent this, use a pressure washer at 3,000 psi, ten inches above the surface of the deck. Always spray the surface in the direction of the grain pattern. Also, make sure the deck is completely dry before placing objects on it, as this will scratch the surface.

While you’re cleaning your deck, you should also check for signs of mold, greying, or discoloration. If you see any of these, it may be time to apply a stain. Make sure the stain contains UV blockers and insecticides, as well as paraffin or oil. If the wood is porous, you may need a second coat of staining sealer.

When cleaning a deck, use the recommended cleaning solution from the manufacturer. Avoid using products with dyes, as they may cause damage to the deck surface. You can also consult a hardware store or timber merchant for recommendations.