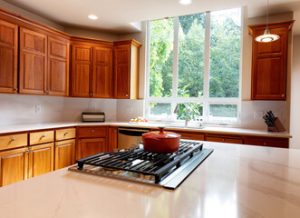
Cabinet Refinishing is a budget-friendly way to change the look of your kitchen without having to replace the doors or cabinet boxes. It involves thoroughly cleaning and preparing the existing cabinets for a fresh coat of stain.
It is important to take care of refinished cabinets so they maintain their pristine appearance. Regular cleaning and inspections should be conducted to keep them looking their best.
Cabinet refinishing is an affordable and eco-friendly way to transform your kitchen. Refinishing can be done by a professional or as a do-it-yourself project. However, it is important to prepare properly to ensure a high-quality finished product. This includes thorough cleaning, removing the hardware, and sanding to create a smooth base for painting.
It is also important to avoid using harsh chemicals or abrasives on your cabinets. Harsh products can strip the finish and cause it to dull or discolor over time. To prevent this, always test any cleaning product on a small area of the cabinet before applying it to the entire surface.
While refinishing can be time-consuming, it is a more affordable option than replacing the cabinets. Cabinet replacement involves removing the existing cabinets, installing new ones, and potentially making modifications to your home’s layout. This process can take weeks and will result in your kitchen being out of use for an extended period.
A cabinet refinishing project is typically much quicker than a full replacement, as it only involves sanding the surface and applying a new finish. This means that you can save money, reduce waste, and enjoy a beautiful new kitchen in less time.
Before you start your cabinet refinishing project, make sure that you protect the countertops and other surfaces in your home with brown builder’s paper or plastic tarps. This will help prevent accidental paint splatter from staining or damaging these areas. You will also want to remove all the doors and drawer fronts, as well as any hardware. Then, clean the surfaces thoroughly with warm water to remove any grease or grime. Once the surfaces are clean and dry, they can be sanded with medium-grit sandpaper.
Once the cabinets are sanded, it is time to begin prepping them for painting. You will want to use a primer to ensure that the paint adheres properly. Next, you will need to apply several thin coats of paint with a mini roller, allowing each coat to dry completely before applying the next. Finally, you will need to sand the surface again and wipe down any excess dust before applying a final coat of paint.
Cleaning
Cabinet refinishing can give your old, worn cabinets a fresh new look without the cost and disruption of a complete kitchen remodel. It is a great way to bring new life to your kitchen, and it is also an eco-friendly option. The process involves cleaning, sanding, and then applying a fresh coat of paint or stain to the existing cabinets. It is important to follow the preparation process carefully in order to ensure that your finished product looks beautiful and lasts for years.
It is important to clean the cabinets before refinishing them, as dirt and grease can impede the process and lead to an uneven or dull finish. You should use a mild detergent solution to wash the cabinets, and make sure to sand them thoroughly to remove any rough surfaces. Use a medium-grit sandpaper to smooth the surfaces of your cabinets, and be sure to sand along the grain for the best results.
You should also clean any areas where you will be masking off the cabinets, such as around the stove or microwave. This will help to protect these areas from splatter and paint drips. You should also make sure that your workspace is well-ventilated while you are working. Wearing a respirator can help prevent breathing in harmful fumes, and you should also use protective eyewear to shield your eyes from dust particles.
Before you can begin the refinishing process, you should remove all of the hardware from your cabinets. It is important to label each piece of hardware, so that it can be easily reinstalled later. It is also a good idea to mark off any areas that you will be painting with tape, so that they can be protected from paint splatter.
After your cabinets are thoroughly cleaned, it is time to start the refinishing process. This can be a messy job, so it is important to cover your floors and other surfaces with drop sheets to prevent stains and spills. You should also wear a respirator when sanding or using chemical-based cleaners.
When you are ready to apply the new finish, start at the top of the cabinet and work your way down. This will help to manage any drips and keep the consistency of the finish consistent throughout the entire cabinet. You should also be patient, as the finishing process can take some time.
Hardware
Cabinet hardware is a small detail that can make a big impact on your kitchen’s style. From hinges to handles and knobs, there is a wide variety of options to choose from. When shopping for cabinet hardware, it’s important to consider the style of your home and decor to ensure the new pieces will look great with everything else in the room. There are three main styles of cabinet hardware: traditional, transitional, and modern. Each has its own distinct look and feel. Selecting the right hardware for your cabinets can be a fun and challenging process, but it’s crucial to do so to avoid any future issues with your cabinetry.
Before you can refinish your cabinets, you will need to remove any existing hardware and clean the surfaces. Using a gentle cleaner formulated for wood and a soft cloth or sponge, gently wipe the cabinets to remove any dirt and grease. Be sure to pay special attention to areas near the handles and knobs where a lot of buildup can occur. Once your cabinets are clean, you can begin sanding the surfaces. Start with medium-grit sandpaper and move to fine-grit once the surface is smooth and free of any bumps or dents. Once you are finished, clean the sanded areas with a damp cloth to remove any remaining dust and debris.
When compared to cabinet refacing, which replaces the door and drawer fronts with new materials, refinishing is less expensive and can be completed in a day. Refinishing also doesn’t require any demolition or extensive construction, which can take weeks and leave your kitchen out of commission for an extended period.
Choosing refinishing over replacement is also an eco-friendly option. By reusing existing material, you reduce the waste created by the manufacturing of new materials and avoid adding to landfills.
Although there are many benefits to choosing refinishing over replacement, there are some limitations as well. While refacing allows you to change the cabinet door style, stain color, and material, refinishing only works with your existing doors and drawer fronts. If you are looking for a completely different look, you would need to consider refacing your cabinets.
Inspection
Cabinet refinishing is an ideal option for homeowners looking to make a big visual impact on their kitchen without spending the money and time involved in a complete remodel. Refinishing is also an environmentally friendly choice. It reduces waste from the manufacturing process of new cabinets and eliminates the need for landfill space. Unlike refacing, which can involve removing the entire cabinet structure and installing new parts, refinishing only involves replacing the door fronts and hardware.
The first step of the refinishing process is to assess the condition of your existing cabinets. If the cabinet boxes are in good shape, refinishing is an appropriate option. However, if the cabinet boxes have significant damage or wear, refacing may be more appropriate.
A thorough inspection includes a full cleaning, degreasing, and sanding of all surfaces to be painted. This is followed by an application of a stain-blocking primer and two coats of 2K Premium European cabinet paint. The entire refinishing process takes between two and four days. During this time, we will mask and cover the countertops, backsplash, floor, and appliances to protect them from any accidental overspray.
During this process, we will also install any new hardware, including handles and knobs, as well as hinges. These are available in a variety of lengths and styles, so you can customize the look to match your personal style. Once the paint is dry, we will remove all masking and clean up the work area. We will also leave you with a maintenance kit with instructions and tools for maintaining your newly refinished cabinets.
Refinishing your cabinets will not only update the overall look of your kitchen, but it will also help to increase your home value. Homebuyers often place a high premium on updated and well-maintained kitchens, so this can be a great selling point when the time comes to sell your home. Moreover, the cost-effectiveness of this renovation will allow you to spend more on other kitchen updates or even a bathroom remodel.