stamped concrete
Concrete Services

The Advantages of Stamped Concrete

Stamped Concrete Colorado Springs is a tough material that’s highly cracking-resistant. However, moisture can seep into the smallest cracks and freeze, expanding them and creating new ones.

A concrete contractor sprays the textured side of the stamp with the color release, which reduces the risk of the concrete sticking to the stamped surface once it dries.

stamped concrete

Color is a key component of stamped concrete. By blending in with existing stone, tile or textured concrete, or by matching the colors of nearby plants and structures, contractors can achieve an authentic look for your patio, pool deck, driveway or other project. Contractors use four different options to color concrete for stamping: integral color, dry shake hardener, tinted powdered release and water-based stains.

Integral color is a pigment that’s mixed in with the concrete before it’s poured. It provides a more consistent base color and offers greater shade choices than surface color products. It also gives contractors the option of adding a texture to the concrete that can’t be achieved with stamps alone.

Dry shake hardener is a product that’s added to the concrete onsite and creates a more natural looking variation of color for your stamped concrete. It’s easier to use than liquid stains and dyes and doesn’t require any curing, so you can get your stamped concrete quickly and start using it right away.

While this method of coloring is very effective, it can be messy and difficult to control outdoors. In addition, the process requires special equipment and can be a health risk for contractors. Lastly, dry shake hardeners are not as durable as concrete and can be easily chipped by traffic or weather.

If you’re concerned about the longevity of your stamped concrete, consider a pre-cast paver or slab instead. These types of materials are nearly three times stronger than poured concrete, have a minimum compressive strength of 8,000 psi and don’t absorb as much water.

Once you’ve chosen your pattern and color scheme, it’s time to prepare the concrete for the stamping process. Contractors may use a masonry grinder to smooth and level the concrete, or they can hand-trowel it to give the surface an aged look.

It’s important to remember that color will fade over time, so it’s vital to reseal the concrete every few years. Resealing keeps the color from fading, protects the surface from moisture and helps it resist cracking and damage. It’s a good idea to choose a high-quality polyurethane sealant for the best results.

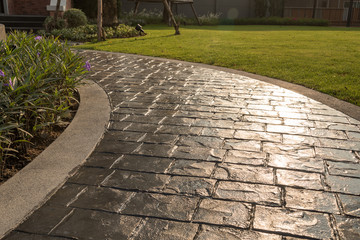
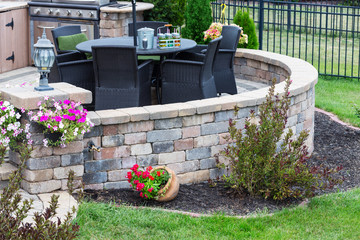
A stamped concrete surface is highly customizable and can be made to mimic the look of stone, tile, brick, wood, slate, cobblestone or any other natural material. This versatility allows homeowners and builders to design unique outdoor living spaces that fit with their landscapes, gardens, home exteriors and overall aesthetic. Additionally, stamped concrete is often less expensive than the materials it mimics and requires far less maintenance.

One of the biggest challenges with stamped concrete is getting the texture right. It’s crucial that contractors take into account the soil conditions at the job site and work with a concrete mix designer to ensure the correct ratio of water to cement is used to create a dense, strong slab capable of withstanding high amounts of foot traffic without cracking. A good concrete contractor will also include a screeding step in the pour to prevent high or low spots that can affect stamping results.

Once the concrete has cured, it’s time to begin the stamping process. The window of time in which to complete this task is fairly short, so it’s important that contractors diagram the layout ahead of time and have enough labor on hand for the project. It’s also a good idea to pre-texture the concrete before placing the stamps, as this can help reduce the amount of time it takes to get the desired look.

Many people use stamped concrete to mimic the look of flagstone, cobblestone or other natural stone paving materials. Using a stone pattern with the right color combinations can create the illusion of a realistic stone surface without the extra cost and care required to maintain it.

Tile patterns are another popular choice for stamped concrete. They can be used for bathroom and kitchen floors, backsplashes, showers and more. This style of stamped concrete can be more economical than buying individual tiles and is extremely versatile.

Wood-textured stamped concrete is another option for those who want the look of real wood but don’t want to deal with its splinters and constant need for upkeep. This type of stamped concrete can be used for patios, driveways, and other paved surfaces in new construction or as an overlay on existing concrete.

Concrete stamps can be used to create a variety of patterns. They can imitate the look of flagstone, slate, natural stone slabs, brick, tile and with proper application they can even resemble wood. These decorative finishes can save you money over the cost of premium building materials and are ideal for patios, walkways, pool decks and driveways.

The stamped concrete process must be executed carefully and quickly to achieve uniform results before the concrete sets. Before starting, the concrete surface should be washed and dried to remove any dust or dirt that might interfere with the stamping. The concrete should then be tamped. It is critical to use consistent pressure and to tamp down each skin evenly. This will prevent overlapping impressions and help you achieve a smooth, eye-pleasing finish.

Once the concrete is tamped, it is important to examine each area for proper stamp placement and alignment. Misplaced stamps will cause an uneven, unsatisfactory result. It is also important to check that all concrete areas are textured in the same pattern. This will give your finished concrete a more realistic appearance and will reduce the chance of future cracking.

To get the best stamped concrete finish, you must apply a color release agent to the textured side of the concrete mats before you begin. This will prevent the stamps from sticking to the concrete once it dries. It is also a good idea to apply the color release agent in advance so it has time to set before the concrete begins to dry.

After applying the release agent, it is important to work quickly and carefully. The window of opportunity in which to stamp the concrete is relatively short, especially in warm weather. The project should be thoroughly diagrammed ahead of time, and all necessary tools and labor should be on hand.

Once the concrete is stamped, it must be tamped again. It is important to use consistent pressure and to avoid walking over the skins on the balls of your feet or tamping at the overlapping edges. These actions may over-emphasize certain areas of your finished concrete and make it appear uneven.

Concrete is a durable material that can last for decades, but like any surface, it will need some maintenance to look its best. Cleaning and resealing are two things that will help your stamped concrete surfaces stay shiny and looking new. A reseal is especially important to keep moisture from penetrating the concrete and causing stains, which can be very hard to remove once they set in.

Regularly sweeping your concrete is the first step to keeping it clean. A broom or leaf blower can clear away dirt, debris, and leaves, which can trap moisture that will eventually cause stains. It is also a good idea to keep things from building up on your concrete surface, like tarps, falling leaves, or equipment.

If you have plants or planters on your stamped concrete, it is a good idea to elevate them at least a quarter of an inch so that air can flow underneath and prevent the buildup of humidity. This will keep the sealer from breaking down, and it will protect the roots of the plants from excess moisture that could lead to rot or mildew.

One thing to watch out for on your stamped concrete is deicing salts, which can cause damage to the concrete and deteriorate the sealant if left to sit on the surface for too long. If you must use deicing salts, try to limit the amount that is tracked on your concrete and be careful about where it “drips off” from parked vehicles.

Another common issue with stamped concrete is cracking. This is due to the movement of water and ice inside the concrete that can cause the tiny cracks to expand and get bigger. This is a problem that can’t be completely avoided, but you can slow down the process by resealing the concrete every two to three years.

Although the cost of stamping and the initial sealant may be more expensive than other decorative flooring options, it is a much longer-lasting option that will stay beautiful with some simple maintenance. If you have questions about the maintenance of your stamped concrete, talk with a contractor that specializes in this type of work.

retaining walls
Concrete Services

What Are The Basics Of Retaining Walls?

A retaining wall makes it possible to create terraces of usable land on sloped properties. It also serves to delineate property lines and discourage neighbors from using your yard without permission.

A retaining wall requires careful planning, and experts are essential to ensure the project is carried out correctly. This includes meeting building codes and adhering to regulations specific to your area. Retaining Walls Charleston SC contractor will help you get the basics done.

retaining wallsDesign

Whether you are planning to build a small retaining wall on your own or enlist the services of a contractor, there are many aspects to consider. A thorough analysis, including site-specific constraints and the ability to utilize space effectively, is essential to a successful outcome. A retaining wall requires proper excavation and foundation preparation, base course installation, interlocking block construction and compaction, drainage features, and structural reinforcement. It is also crucial that you check local building codes and regulations to determine if you need a permit or must adhere to any guidelines for your area.

The design of a retaining wall should take into account the type of soil to be retained as well as its bearing capacity and potential surcharge loads. It is also necessary to examine the site conditions and groundwater issues. Structures that require a piled or rigid foundation may be more costly than those that do not. The cost of materials will be a major factor in the final price as will the degree of maintenance required.

There are several types of retaining walls that you can choose from, depending on your budget and aesthetic preferences. Popular options include concrete blocks, bricks, and timbers. Each has its unique advantages but they all must be considered carefully about the function(s) of your retaining wall.

A retaining wall that is designed to retain soils at two different elevations must be capable of resisting lateral pressures from the retained soil and any other surcharge loads. This will typically involve the use of a footing system with a shear key at the toe, which must be designed to control the maximum pressures acting on it.

To determine the appropriate footing size and geometry for your project, it is important to consult with a professional engineer familiar with retaining wall design. A detailed analysis, including a site visit and soil testing, is required to make an informed recommendation. An engineer will evaluate the available space, site-specific constraints, and the ability to implement a structure that meets both your functional and aesthetic goals.

Materials

The basic materials that make up a retaining wall vary according to function, cost, and height. Decorative walls can use almost any type of block or stone that the owner likes, while those serving a structural purpose must be designed and built with durable, long-lasting materials suited to the site conditions.

To start building a retaining wall, first excavate the area where it will be installed. Line the trench with landscape fabric and fill it with gravel or crusher-run base material. Compact thoroughly, adding more base as needed for stability.

Install perforated drainage pipe, if necessary. Next, backfill the space behind your wall with a 6-inch layer of granular backfill (gravel or similar aggregate). This helps to prevent soil erosion and ensures that water can drain away from the retained area.

Lay your retaining wall blocks, starting with the bottom course. Using a torpedo level, be sure that each block is straight front-to-back and side-to-side. To help ensure that the blocks lock together in a proper “Running Bond” pattern, each row of blocks should be set so that there is a minimum of 1” of space between each block. For a more sturdy wall, you may also choose to add a layer of geogrid between each course of blocks.

Continue to build the retaining wall, adding courses one at a time and tamping down each section as you go with a hand tamper. Be sure to use good-quality gravel for your backfill, not dirt. Dirt swells when it gets wet, placing unnecessary pressure on the retaining wall. Gravel, on the other hand, will not swell and is less likely to damage your retaining wall.

When the retaining wall is complete, top it with a 6-inch layer of native soil to encourage plant growth and improve the aesthetics of the project. Be sure to check with your local building or zoning authority for any additional requirements for the construction of a retaining wall in your particular jurisdiction. Also, be sure to call a contractor before beginning any construction to have any utility lines marked.

Installation

Retaining walls have to support their weight and resist lateral pressure from the soil they retain. These pressures can become intense and lead to buckling over time, especially in saturated ground or poorly designed structures. Water is the number one enemy of retaining walls, as it causes erosion around the base and saps strength from concrete and mortar. Poor drainage, clogged drains, and freeze/thaw cycles can also be damaging.

A good retaining wall is an investment that requires careful maintenance to protect the structure and extend its lifespan. Close inspection should be done to check for deteriorated joints, cracks, bulging, shifting, and crumbling of the material. If a wall is damaged, repairs can be made by using solutions like helical piers or wall plate anchors, depending on the condition of the structure.

The first step in building a retaining wall is to lay a course of blocks. Using a carpenter’s level, make sure the block is perfectly level left-to-right and front-to-back. If not, use a hammer and chisel to remove the flange from the blocks so that they sit more evenly on the ground. When the first row is complete, use a tool to cut half blocks for the second and subsequent rows. This staggers the blocks so that they do not align with each other in a traditional bricklaying pattern.

Continue to build each tier of the retaining wall, shoveling in backfill as you go. Make sure to add gravel before each new tier, and tamp it down with a hand tamper to help it compact well. Be sure to install drains behind the foot of each tier, as well. Drainage is crucial for preventing hydrostatic pressure from building up in the soil and pushing against the retaining wall.

Finally, all retaining walls should lean into the hill they should retain at least 1 inch for every 12 inches of height. This is called the batter. Taller retaining walls should be tied to the hillside with tiebacks, also known as deadman anchors. These are 6-foot-long, T-shaped steel rods buried in the hillside and attached to the wall with a hex nut.

Maintenance

Retaining walls aren’t just good for preventing soil erosion, they also add value and beauty to a property. But they’ll only last if they’re properly maintained. Regular inspections and proper care can keep them structurally sound and looking great.

A retaining wall’s quality of construction and the materials it’s made from have an impact on how long it will last and how much maintenance is needed. Poor materials and construction techniques can lead to early deterioration or even failure of the structure. In addition, water seepage can damage the integrity of a retaining wall by causing rot or even corrosion of steel elements inside the structure.

In addition to quality construction, a retaining wall must be adequately anchored and supported to prevent failure and erosion. In many cases, this requires the use of anchors, which are cables or other stays anchored in the soil or rock behind the wall. These can be driven into the material using boring or often, injected with pressurized concrete that expands at the point of penetration. Anchors can be used in combination with other methods, such as geogrid reinforcement layers, to provide additional support and stability.

Although retaining walls are built to withstand lateral pressure from the soil, excessive pressure can cause them to deform or collapse. In many cases, this is caused by factors such as inadequate drainage, adding too much load to the retained soil, or changing landscape conditions.

The best way to prevent these problems is to check for early warning signs that the retaining wall may need repairs. These include bulging, cracks in the blocks or mortar and gaps between them. In addition, if a wall has pooling water or other evidence of soil moisture buildup, it’s important to take action immediately.

When these signs are detected, the best course of action is usually to call a professional for repairs or replacement. These professionals can assess the problem and determine the most effective solution, which might include repairs or tiebacks to stabilize the wall, as well as the installation of new drainage features to prevent further erosion. In severe cases, it might be necessary to replace the entire retaining wall.