retaining walls
Concrete Services

What Are The Basics Of Retaining Walls?

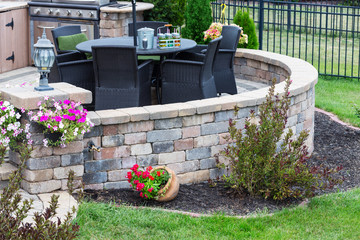
A retaining wall makes it possible to create terraces of usable land on sloped properties. It also serves to delineate property lines and discourage neighbors from using your yard without permission.

A retaining wall requires careful planning, and experts are essential to ensure the project is carried out correctly. This includes meeting building codes and adhering to regulations specific to your area. Retaining Walls Charleston SC contractor will help you get the basics done.

retaining wallsDesign

Whether you are planning to build a small retaining wall on your own or enlist the services of a contractor, there are many aspects to consider. A thorough analysis, including site-specific constraints and the ability to utilize space effectively, is essential to a successful outcome. A retaining wall requires proper excavation and foundation preparation, base course installation, interlocking block construction and compaction, drainage features, and structural reinforcement. It is also crucial that you check local building codes and regulations to determine if you need a permit or must adhere to any guidelines for your area.

The design of a retaining wall should take into account the type of soil to be retained as well as its bearing capacity and potential surcharge loads. It is also necessary to examine the site conditions and groundwater issues. Structures that require a piled or rigid foundation may be more costly than those that do not. The cost of materials will be a major factor in the final price as will the degree of maintenance required.

There are several types of retaining walls that you can choose from, depending on your budget and aesthetic preferences. Popular options include concrete blocks, bricks, and timbers. Each has its unique advantages but they all must be considered carefully about the function(s) of your retaining wall.

A retaining wall that is designed to retain soils at two different elevations must be capable of resisting lateral pressures from the retained soil and any other surcharge loads. This will typically involve the use of a footing system with a shear key at the toe, which must be designed to control the maximum pressures acting on it.

To determine the appropriate footing size and geometry for your project, it is important to consult with a professional engineer familiar with retaining wall design. A detailed analysis, including a site visit and soil testing, is required to make an informed recommendation. An engineer will evaluate the available space, site-specific constraints, and the ability to implement a structure that meets both your functional and aesthetic goals.

Materials

The basic materials that make up a retaining wall vary according to function, cost, and height. Decorative walls can use almost any type of block or stone that the owner likes, while those serving a structural purpose must be designed and built with durable, long-lasting materials suited to the site conditions.

To start building a retaining wall, first excavate the area where it will be installed. Line the trench with landscape fabric and fill it with gravel or crusher-run base material. Compact thoroughly, adding more base as needed for stability.

Install perforated drainage pipe, if necessary. Next, backfill the space behind your wall with a 6-inch layer of granular backfill (gravel or similar aggregate). This helps to prevent soil erosion and ensures that water can drain away from the retained area.

Lay your retaining wall blocks, starting with the bottom course. Using a torpedo level, be sure that each block is straight front-to-back and side-to-side. To help ensure that the blocks lock together in a proper “Running Bond” pattern, each row of blocks should be set so that there is a minimum of 1” of space between each block. For a more sturdy wall, you may also choose to add a layer of geogrid between each course of blocks.

Continue to build the retaining wall, adding courses one at a time and tamping down each section as you go with a hand tamper. Be sure to use good-quality gravel for your backfill, not dirt. Dirt swells when it gets wet, placing unnecessary pressure on the retaining wall. Gravel, on the other hand, will not swell and is less likely to damage your retaining wall.

When the retaining wall is complete, top it with a 6-inch layer of native soil to encourage plant growth and improve the aesthetics of the project. Be sure to check with your local building or zoning authority for any additional requirements for the construction of a retaining wall in your particular jurisdiction. Also, be sure to call a contractor before beginning any construction to have any utility lines marked.

Installation

Retaining walls have to support their weight and resist lateral pressure from the soil they retain. These pressures can become intense and lead to buckling over time, especially in saturated ground or poorly designed structures. Water is the number one enemy of retaining walls, as it causes erosion around the base and saps strength from concrete and mortar. Poor drainage, clogged drains, and freeze/thaw cycles can also be damaging.

A good retaining wall is an investment that requires careful maintenance to protect the structure and extend its lifespan. Close inspection should be done to check for deteriorated joints, cracks, bulging, shifting, and crumbling of the material. If a wall is damaged, repairs can be made by using solutions like helical piers or wall plate anchors, depending on the condition of the structure.

The first step in building a retaining wall is to lay a course of blocks. Using a carpenter’s level, make sure the block is perfectly level left-to-right and front-to-back. If not, use a hammer and chisel to remove the flange from the blocks so that they sit more evenly on the ground. When the first row is complete, use a tool to cut half blocks for the second and subsequent rows. This staggers the blocks so that they do not align with each other in a traditional bricklaying pattern.

Continue to build each tier of the retaining wall, shoveling in backfill as you go. Make sure to add gravel before each new tier, and tamp it down with a hand tamper to help it compact well. Be sure to install drains behind the foot of each tier, as well. Drainage is crucial for preventing hydrostatic pressure from building up in the soil and pushing against the retaining wall.

Finally, all retaining walls should lean into the hill they should retain at least 1 inch for every 12 inches of height. This is called the batter. Taller retaining walls should be tied to the hillside with tiebacks, also known as deadman anchors. These are 6-foot-long, T-shaped steel rods buried in the hillside and attached to the wall with a hex nut.

Maintenance

Retaining walls aren’t just good for preventing soil erosion, they also add value and beauty to a property. But they’ll only last if they’re properly maintained. Regular inspections and proper care can keep them structurally sound and looking great.

A retaining wall’s quality of construction and the materials it’s made from have an impact on how long it will last and how much maintenance is needed. Poor materials and construction techniques can lead to early deterioration or even failure of the structure. In addition, water seepage can damage the integrity of a retaining wall by causing rot or even corrosion of steel elements inside the structure.

In addition to quality construction, a retaining wall must be adequately anchored and supported to prevent failure and erosion. In many cases, this requires the use of anchors, which are cables or other stays anchored in the soil or rock behind the wall. These can be driven into the material using boring or often, injected with pressurized concrete that expands at the point of penetration. Anchors can be used in combination with other methods, such as geogrid reinforcement layers, to provide additional support and stability.

Although retaining walls are built to withstand lateral pressure from the soil, excessive pressure can cause them to deform or collapse. In many cases, this is caused by factors such as inadequate drainage, adding too much load to the retained soil, or changing landscape conditions.

The best way to prevent these problems is to check for early warning signs that the retaining wall may need repairs. These include bulging, cracks in the blocks or mortar and gaps between them. In addition, if a wall has pooling water or other evidence of soil moisture buildup, it’s important to take action immediately.

When these signs are detected, the best course of action is usually to call a professional for repairs or replacement. These professionals can assess the problem and determine the most effective solution, which might include repairs or tiebacks to stabilize the wall, as well as the installation of new drainage features to prevent further erosion. In severe cases, it might be necessary to replace the entire retaining wall.

Plumbing
Plumbing

The Basics of Residential Plumbing

Your home’s Clearwater Plumbing system has two distinct subsystems that bring fresh water in and drain wastewater out. In most homes, incoming water is under pressure and accessible from the main valve located close to your meter.Plumbing

Residential plumbers often work on plumbing problems in houses and apartments. Issues like clogged toilets or water leaks are easier to diagnose and fix in smaller spaces.

Whether it’s bringing fresh water in or carrying waste out, plumbing pipes carry a high volume of pressurized water at varying temperatures. Residential plumbing pipes are constructed of a variety of materials, but all have to be tough enough to handle the pressure and temperatures they’re exposed to.

The main water supply line connects to the public main line on your property and runs through a meter that registers how much water you use, then branches off to faucets, toilets, showers, and appliances such as washing machines. Water supply lines can also run outside your home for outdoor uses, such as watering the lawn or filling the pool.

There are several different types of pipes used in plumbing, depending on the needs of the system and its age. Galvanized iron and steel pipes were once popular for plumbing, but they’re prone to corrosion over time and are now typically replaced with more modern alternatives. If you have galvanized steel pipes in your home, it’s recommended that you get them replaced with copper pipe, which can withstand higher water pressure and doesn’t corrode as easily.

Plastic pipes are now a common choice for water supply lines, as they’re cheap and easy to install. They can resist blockages better than metal pipes and are made from a safer material that doesn’t leach chemicals into drinking water. PVC is a good choice for water supply pipes in newer homes, while polyethylene cross-linked (PEX) is often used in plumbing upgrades and replacements in older houses.

Rigid copper pipe is still sometimes used in plumbing, but it’s less durable than more modern alternatives. It can be cut with a hacksaw, but it’s best to have it installed by a professional plumber, as improper installation can lead to leaks and other problems.

Flexible hoses, sometimes known as “flex lines” or “braided hoses,” make the final connection between a home’s water supply pipe and individual fixtures such as sinks, toilets, and washers. They’re usually made from rubber surrounded by stainless steel and are available in a range of lengths.

Water distribution pipes

A home has a vast network of pipes to bring in fresh water and move wastewater out. There’s the main water line that leads into your home from the street or public water supply, followed by a series of water supply pipes directing the water to various fixtures throughout your house. There are also drainpipes that connect sinks, tubs, and toilets to the main pipes behind your walls or under your floors.

Residential water supply pipes are usually made of copper, PVC, or cast iron. They’re sized to match the home’s water demand and may be joined with flange, nipple, or compression joints. It’s common to use larger-diameter CPVC or PP pipes for risers and headers, while smaller-diameter PE-RT or PEX tubing is used for drops and branches to individual outlets.

Your home’s water supply system is a vital part of your plumbing, and it’s important that it’s properly designed and maintained. For example, the pipes that carry cold water to your faucets, showers, and other appliances should be kept away from hot-water heaters to prevent overheating and scalding. Also, the water pressure in your house should be monitored closely to ensure it stays within a safe range.

There are several factors to consider when determining the right type of pipe for your home, including how it will be used and your budget. You can find many different types of pipes on the market today, each with its own benefits and drawbacks. Choosing the right residential plumbing pipe will help your plumbing system perform effectively and last longer.

The most popular plumbing pipes in the United States are CPVC and PEX, which are durable, corrosion-resistant, and can be used for both hot and cold water systems. In fact, PEX is replacing copper at a rapid rate since it offers a better balance of performance, cost, and environmental sustainability. However, it’s important to speak with your plumber or contractor about the best choice for your home. They’ll be able to assess your plumbing needs and help you select the right pipe material for your project.

Drain Pipes

The plumbing pipes that carry wastewater from fixtures are usually referred to as “drain” or “waste” pipes. These are typically galvanized iron or steel but may be polyvinyl chloride (PVC) or welded polyethylene cross-linked (PEX). The main drain pipe is often the same as the water supply line. The drain-waste-vent system is very important since it moves sewage and other waste safely from fixtures into the sewer line and prevents backflow. It also helps in eliminating odors and preventing the formation of stagnant water or debris.

The size of the drain pipe depends on the number of fixture units that it serves. The minimum size is 6 inches in diameter for a house drain. The drain pipe should be sloped toward the sewer to promote scouring action and prevent blockages.

A drain trap is a curved or S-shaped section of pipe under a sink, bathtub, or other drainage fixture that forms a seal to prevent the escape of sewer gas into the house. Each drain fixture must have a trap. The trap must be large enough to allow the flow of water into and out of the trap with sufficient force to keep the trap’s liquid level upstream of the fixture. The drain trap must be free of any obstructions that would reduce its effectiveness, such as hair, soap scum, or food scraps.

Where a drain line, building sewer, or building waste pipe has more than one change of direction within 40 feet (12 192 mm) of the developed length of the piping, a cleanout shall be provided at each change of direction. The cleanouts should be the same size as the pipes they serve.

The plumbing system is made up of many components that work together to provide a safe and functional home. It’s essential for homeowners to understand how each component works, what can go wrong, and who is responsible for maintaining it. With this knowledge, homeowners are better prepared to make plumbing repairs and can avoid costly mistakes. This also allows them to take advantage of cost-saving home improvement projects.

Vents and traps

Vents are a vital part of your plumbing system. They keep both negative and positive pressures from building in your pipes, allowing water to flow freely and preventing dangerous sewer gases from entering your home. They also provide an escape route for sanitary waste, which disperses it high above your house into the air where it can’t enter your living spaces.

If your plumbing doesn’t have a properly functioning vent, it could lead to a variety of issues. You may experience sluggish draining or even a rotten smell coming from a sink or tub. These are symptoms of a blocked or damaged vent, which can cause dangerous backpressure that could damage your plumbing and clog your traps.

A vent pipe is little more than a pipe that runs from your plumbing fixture up through the roof of your house. If you look up at the roof of your house, you should be able to see these pipes poking out, and they’re usually pretty easy to identify by their color. Despite what some DIY explainers might tell you, a vent’s primary purpose is not to allow air into your pipes.

In fact, if you have your home’s vents installed correctly, they should be a good distance away from your traps to prevent siphoning. This helps prevent dangerous, odor-causing sewer gases from infiltrating your home as they escape from the pipes and the sewer line.

Your plumbing can have several different types of venting options, depending on the construction of your home and other factors. The most common is a true vent, which is a vertical pipe that connects to the drain line near your fixtures and extends up into the roof of your home. Often, this is paired with a re-vent pipe or auxiliary vent that connects to the vertical vent and runs up and over the roof of your house.

Another common method of venting is what’s known as a “conventional vent.” This involves individual vents that connect to two or more of your drains, with each being sized according to Table 909.1 of the International Plumbing Code. Regardless of which type of venting you have, you’ll want to be sure that it is regularly checked and maintained by qualified plumbing service experts.

Electrician
Electrician Services

Hiring an Electrician

If you’re thinking of hiring an electrician, there are many things to consider. First of all, you want to make sure that they are licensed and bonded. Second, you also want to make sure that they are experienced. Finally, you should consider the type of work that they will do. For example, if you have a commercial building, you might want to hire Electrician Vernon.Electrician

Commercial electricians install and maintain electrical systems in buildings. They install wiring, receptacles, lights, and other devices. Some commercial electricians also maintain and repair old equipment and appliances.

A commercial electrician can be found working in many different places. They may work in offices, schools, government agencies, and townships. Typical tasks include installing new outlets, hanging lights throughout a building, and troubleshooting problems.

The duties of a commercial electrician differ from those of an industrial electrician. Industrial electricians tend to be more knowledgeable about repairing and maintaining equipment. Their training requires a more comprehensive education.

Industrial electricians also require more specialized knowledge. In addition, they may have additional certificates. These certifications can increase their employment prospects.

Depending on the industry, a commercial electrician may be required to work late at night or in cramped or small spaces. Commercial electricians may need to work in areas with high levels of voltage.

Regardless of whether they’re in an office or a warehouse, commercial electricians should be able to understand and follow safety regulations. For example, in a kitchen or office building, some local codes may require ground fault circuit interrupters.

Industrial electricians also need to learn more about the different kinds of electricity. Their job may involve repairing and replacing conduits and switch boxes.

Unlike residential electricians, commercial electricians must have a license to perform the work. Those with a bachelor’s degree will have better employment prospects. Moreover, they may be able to move into management.

An apprenticeship is a common way for commercial and residential electricians to gain their skills. During the apprentice phase, they receive both on-the-job and classroom instruction. Typically, the program lasts four to six years. At the end of the program, they’re prepared for an examination to earn a journeyman electrician’s license.

The initial on-the-job training for both residential and commercial electricians can be in the form of an apprenticeship or direct on-the-job training with an employer. Apprentices are typically given the responsibility of doing more complex tasks. During this time, they may receive on-the-job training from other electricians and complete formal classroom education.

An industrial electrician is a person with a wide range of skills and is a key player in an industrial plant’s operations. This person is responsible for the installation and maintenance of electrical systems in the factory and for repairing or replacing equipment when necessary. Some industrial electricians work in a team, while others are on their own. Typically, industrial electricians work late nights and on weekends.

As an industrial electrician, you are expected to have strong troubleshooting skills. These skills may also include a deep understanding of how to keep industrial systems secure from hacking.

The best way to become an industrial electrician is to gain a formal trade education. There are several types of programs available. Some require associate’s degrees, while others require a bachelor’s degree. Upon completion, you can continue on to advanced training.

It is a good idea to learn about smart grid technology, which allows for better management of power grids. Industrial electricians need to know about smart grid systems because they are needed to install and maintain these systems.

Another benefit of working as an industrial electrician is that they are always on the job when a system malfunctions. They can be called in to do a quick test of a machine or to conduct a regular check of a system’s performance.

If you want to work as an Industrial Electrician, you’ll need to learn about all kinds of electrical systems. You’ll need to read technical documents and blueprints and understand the proper wiring for optimal functioning.

Although a lot of work goes into becoming an Industrial Electrician, it’s a rewarding career. In fact, the national average salary for this profession is $56,900 per year. Depending on your location, the pay will vary. Those in larger cities tend to earn higher salaries.

The most important thing to remember is that this industry is always growing. However, the pay will depend on your level of qualifications. For example, an apprentice earns the lowest salary, while a master industrial electrician can earn a much higher salary.