
Lighting installation is a bit more complicated than simply plugging in a new lamp. Because many light fixtures are installed in ceilings or high up on walls, installing them requires a ladder and sometimes a helper to support the fixture and hold nuts and tools.
Start by shutting off power at the breaker box to the room you are working in (note that shutting a single breaker shuts off power to just that area of your home). Use a voltage tester to confirm that the electricity is completely off. Make sure to talk with Nashville Lighting Installation professionals for your lighting projects.
 Choosing The Right Fixture
When you want to add light fixtures to your home, you have a lot of options. However, it is important to choose the right fixture for your needs and the look you are going for in your home. The wrong fixture can make your home feel dark and dated, while the right fixture can elevate your home’s aesthetic appeal.
When it comes to choosing a new lighting fixture, the first thing you need to consider is the style. There are a wide range of styles available, from chandeliers to recessed lighting. It is a good idea to choose a style that will complement the other design elements in your home, such as paint color or furniture. You will also want to choose a fixture that is suitable for the room in which it will be installed.
Another important factor in deciding on the type of light fixture is the amount of light you need. This can be determined by measuring the height and width of the room. Then, you can use the result to calculate how large of a fixture is needed. It is a good idea to choose the largest fixture that will fit comfortably in your space, but not so large that it will be difficult to install and operate.
Finally, you will need to decide what kind of bulb you would like in the fixture. There are many different types of bulbs, including incandescent, fluorescent, LED, halogen, and mercury vapor. Each of these types has a unique color tone and can be used in different types of fixtures. It is important to choose a bulb that is compatible with the fixture and will provide the amount of light you need.
Once you have selected the light fixture and a style that will work well in your home, it is time to begin the installation process. It is a good idea to have a professional handle the lighting installation, as they will be able to ensure proper load balance and precision. In addition, they will be able to properly identify and address any potential issues before they become costly problems down the road.
Choosing The Right Light Bulbs
The right light bulbs can enhance the look of a room and create the perfect ambiance. They can also save energy and reduce the amount of time you spend replacing burned-out light bulbs. When choosing light bulbs, it is important to consider color temperature, wattage, and shape.
First, you need to decide what type of color temperature you want to use in the room. For example, if you want a warm and cozy feel in your bedroom, you may want to choose soft white light bulbs with lower wattages. On the other hand, if you want a brighter, more energetic room, you might prefer daylight bulbs with higher wattages.
Once you know what type of bulb you need, you can start shopping around. There are a lot of options out there, from traditional incandescent bulbs to energy-efficient LEDs. When you are shopping for lights, look at the wattage and lumens on the package. Watts measure how much power a bulb uses and can give you a general idea of its brightness, but the most important factor is lumens. The higher the lumens, the brighter the bulb.
Another thing to keep in mind is the shape of the bulb and how it will fit in your fixture. Light bulbs come in a variety of shapes, from standard round to long, slim bulbs designed for hard-to-reach fixtures like candelabras and floor lamps.
Finally, if you are looking for a smart light bulb that can be controlled with a smartphone or tablet, you will need to make sure the bulb is compatible with your home’s wireless system. Some lights can even be set to turn on or off automatically based on movement, making them ideal for exterior security lighting.
Once you have decided on the color, wattage, and shape of your light bulbs, it’s time to shop around for the best deal. Many stores have coupons and deals, so be sure to check online before you go to the store. Also, don’t forget to factor in shipping costs and any other charges, such as recycling fees.
Choosing The Right Wiring
When working with electricity, it is always important to take safety precautions. You should turn off the power to any lights or switches you want to work on and test for electrical current with a circuit tester before starting. This will ensure that you do not accidentally make a dangerous mistake with your wiring. Once you have tested for current, you can begin to work on the wiring for your new light fixture.
When you are ready to start, it is a good idea to clean the old fixture and installation area before beginning. It will be easier to work in a clean environment, and you will reduce the risk of making mistakes that could be dangerous. You will also need to remove the mounting bracket from the ceiling or wall that holds the existing light in place. This is usually done with a Phillips-head screwdriver. Once the bracket is removed, you will be able to access the wires in the ceiling.
Once you have removed the old wires from their terminals, you will need to decide what type of wiring you will use for your new light fixture. Generally, you will want to use thicker wires than those used in your house, as these are more durable and can handle more amperage. If you do not know what type of wire you have, you can check the amperage rating on the fuse or circuit breaker, or try to determine it by its color (black is typically hot, and white is neutral).
After you have determined what kind of wire you have in your home, you will need to choose a wire gauge. The higher the number on the gauge, the thinner the wire. You should select a wire that is rated for the amount of amperage you expect to use, or that is recommended for the light fixture itself. For example, LED lights do not draw a lot of current and can be powered by smaller gauge wires than other types of lighting fixtures.
When you are ready to splice the new wires, you will need to use a wire connector to connect them. Normally, the black wire from the switch will be connected to one terminal of the new light fixture, and the white wire from the light will be connected to the other terminal of the switch. A pigtail will then be added so that the first new light can reconnect back into the circuit.
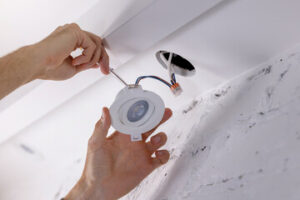
Installing The Light
Installing a new light fixture is one of the quickest and easiest upgrades you can make to your home. However, like any electrical project, it requires careful attention to safety. First, always read the manufacturer’s instructions before starting work. Most fixtures come with simple step-by-step instructions that will guide you through the process. Then, once you have installed the fixture, check to make sure that it is plugged in and that all the wires are connected properly. Generally speaking, black and white wires connect to silver screws in the ceiling box, while a green (grounding) wire will either attach to the grounding screw or a dedicated copper wire that comes from the electrical panel.
If you are replacing an existing fixture, it’s best to have a helper for this project — especially if the new fixture is large or heavy. Shut off power at the breaker box to the circuit that powers the old fixture and label the breaker so that no one accidentally turns it back on. It’s also a good idea to double-check that the power is off by using a non-contact voltage tester.
Then, carefully unscrew the fixture from the ceiling and remove any light bulbs, shades, or glass covers that are still attached. This makes the fixture easier to handle and protects you from broken glass. It’s a good idea to take pictures of the wiring connections so you can refer to them when you’re installing the new fixture.
Once the old fixture is removed, disconnect the wires from the ceiling by loosening the connector caps and gently pulling apart the wires. Then, use a wire stripper to cut off 3/4 inch of the sheathing on each end of the wire. After that, simply twist like-colored wires together and cap them with a wire nut. Then, attach the fixture’s mounting bracket to the junction box and screw it into place. If the light is a ceiling fan, be sure to screw it into a brace box that will support it without drilling additional holes in the ceiling. If you’re not comfortable working with electricity, hire a licensed electrician to tap into your house’s wiring and install a junction box for your new light fixture.